Phoenix Server Install Guide
This guide will assist you with installing Phoenix Server. Phoenix is the latest version of the Voice Solutions server product line, providing a complete dictation and transcription solution. If you need assistance with product configuration or features, see the Phoenix Server User Guide.
Skip down to:
System Requirements
Installing Server Core Software
Installing Telephony Cards
Installing Additional Features
Configuring Windows
Product Activation
Minimum System Requirements
Operating System
Microsoft Windows XP SP3 (32-bit)
Microsoft Windows Server 2008 (32-bit & 64-bit)
Microsoft Windows 7 (32-bit & 64-bit)
Hardware
Dual-Core processor
4 GB RAM
5 GB of available hard disk space
PCI slot or USB port (if using the telephony feature)
1024 x 768 resolution with 16-bit color
Virtual Server Supported: Yes
Recommended System Requirements
Operating System
Microsoft Windows Server 2019 (32-bit & 64-bit)
Microsoft Windows 10 (32-bit & 64-bit)
Hardware
Quad-Core processor
8 GB RAM
200 GB of available hard disk space
PCI-Express slot or USB 3.0/2.0 (if using the telephony feature)
Resolution greater than 1024 x 768 with 32-bit color
Virtual Server Supported: Yes
Installing Server Core Software
Step 1: If you are installing Phoenix on a computer with Windows 7 or later, disable User Account Control and then reboot. It can be re-enabled after the installation is complete. In addition, temporarily disable any anti-virus or anti-spyware software to prevent conflicts during the installation.
Step 2: Insert the installation CD. From the main screen select Install Phoenix Server.

Step 3: The installer will appear. Simply click Next to the first couple of screens.
• You will then be prompted to select the installation path (see image below). Unless there is a specific reason to install the software on a different drive letter, we recommend that you keep the default path of C:\VoiceSolutions. If you select a different drive letter as the destination, be sure to keep the VoiceSolutions directory (ex. D:\VoiceSolutions).
• Leave the option Everyone selected; do not select Just Me. When finished with this screen, click Next again until the installer starts.

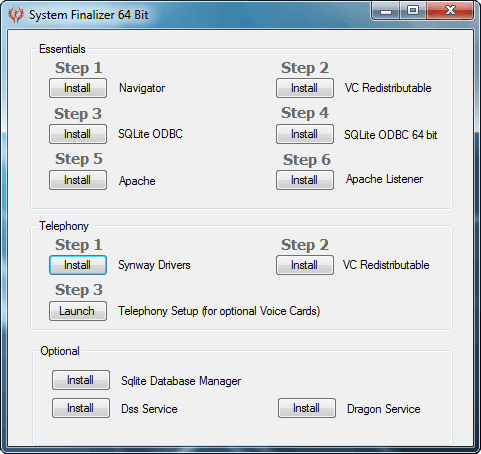
Step 4: When the primary installer finishes, the System Finalizer application will automatically pop up (see image below). The install steps are numbered on this screen to help guide you in completing the installation process. Under the Essentials section, start by clicking the Install button under Step 1 to install the Navigator.

Step 5: The Phoenix Navigator is very simple - just click Next to all the prompts. The only option you may need to change is the installation path (see image below). By default it is C:\VoiceSolutions\Navigator. You MUST install the application under the Phoenix Server's root. This is the path you set in Step 3. If you kept the default path in Step 3, then keep the default path here as well.

Step 6: Now that the Navigator is installed, under the Essentials section of the System Finalizer, click the Install button on Step 2 for VC Redistributable (see image below). Simply click Next to all prompts.

Step 7: Continuing with the steps under the Essentials section of the System Finalizer, click the Install button on Step 3 for SQLite ODBC. Click Next to all prompts until you reach Choose Components screen (see image below). Check the SQLite+TCC option and then click Install. If you do not check this option, most of the Phoenix services will not be able to start.

Step 8 (64-bit computers only): Continuing with the steps under the Essentials section of the System Finalizer, click the Install button on Step 4 for SQLite ODBC 64 bit (see image below). Note that this option will only be available if you are installing on a 64-bit computer. Simply click Next to all prompts. If the computer is 32-bit this button will be grayed out and you should skip to the next step.

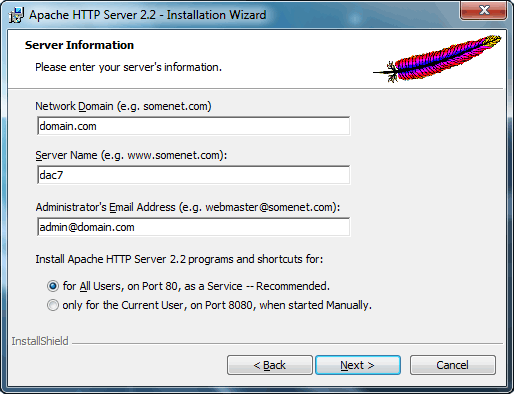
Step 9: Continuing with the steps under the Essentials section of the System Finalizer, click the Install button on Step 5 for Apache. Click Next to the prompts until you reach the Apache Server Information screen (see below).
• Enter your domain name in the Network Domain field. If you are not on a domain, then try entering your computer's name.
• The Server Name field should have the computer's name. It is VERY important that this be correct. If you plan on changing the computer's name, do so now before installing Apache (note: you will have to reboot for the name change to take effect).
• Enter a technical support email in the Administrator's Email Address field. This field is never used by Phoenix but it is recommended that the DAC dealer's support email address be entered.
• Keep the default option selected for All users, on Port 80, as a Service -- Recommended and click Next.
• You will be given a screen to choose Setup Type with the options of Typical and Custom. Keep the default option of Typical and click Next for the remaining prompts.
Step 10: Continuing with the steps under the Essentials section of the System Finalizer, click the Install button on Step 6 for Apache Listener . A command prompt screen may appear briefly (see image below). No action is required on your part.

Phoenix Server is now installed!
After rebooting, you should have the Apache and VS Listener services running. If you will be installing Telephony Cards or Additional Features, proceed on to those sections. If not, then be sure to follow the steps in the Configuring Windows and Product Activation sections.
Skip down to:
Installing Telephony Cards
Installing Additional Features
Configuring Windows
Product Activation
Installing Telephony Cards
You only need to follow these installation steps if you are adding a PCI or USB telephony card to the Phoenix Server. If you are using the USB option, it is recommended that you do not use a USB hub. If it is absolutely necessary, make sure the USB hub is a powered model (plugs into an outlet) to ensure the telephony card gets enough power.
Step 1: Install your telephony card or connect the USB cable. Ignore any Windows New Hardware prompts that appear.
Step 2: Open the Phoenix System Finalizer. By default this is located at C:\VoiceSolutions\Temp\System Install Finalizer\Install Finalizer.exe. Under the Telephony section, click the Install button for Synway Drivers (see image below). The Synway installer will open.
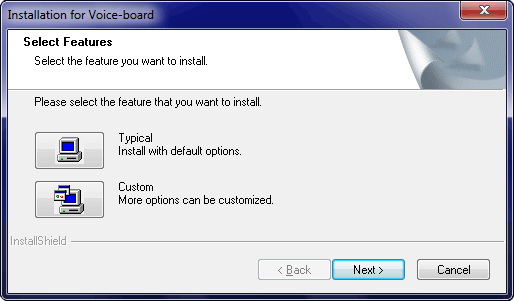
Step 3: Click Next to the prompts until you reach a screen asking you to Select Features. Click on Typical to continue.
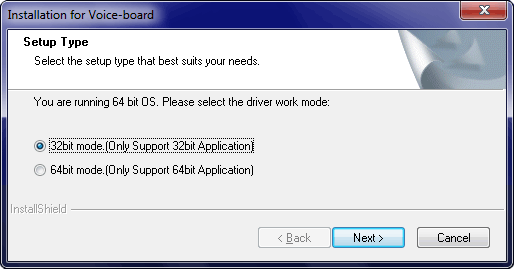
Step 4 (64-bit computers only): If you are installing on a 64-bit computer, you will be prompted to choose between 32-bit and 64-bit drivers. Select 32-bit mode and click Next. This is because although the computer is 64-bit, the telephony service (CVRS) runs in 32-bit mode.
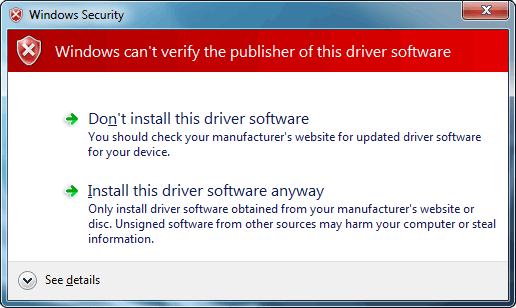
Step 5: You may receive a Windows Security popup, warning you that "Windows can't verify the publisher of this driver sofware". Select Install this driver software anyway to proceed. When the driver installation finishes it should produce a small popup stating the voice card(s) were installed successfully and list the serial number(s). The installer will close.
Step 6 (64-bit computers only): Continuing with the steps under the Telephony section of the System Finalizer click the Install button on Step 2 for VC Redistributable (see image below). Simply click Next to the prompts. If the computer is 32-bit this button will be grayed out and you should skip to the next step.

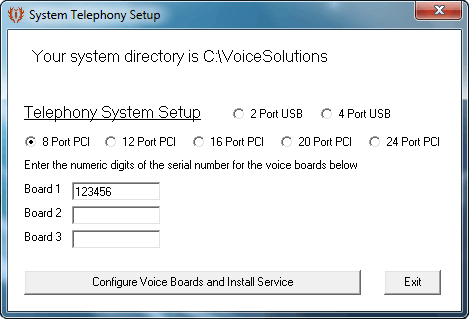
Step 7: Continuing with the steps under the Telephony section of the System Finalizer click the Launch button on Step 3 for Telephony Setup (see image below). This will open the System Telephony Setup application.

Step 8: Start by selecting what type of telephony card(s) you have installed. If you have multiple PCI cards, then select the total number of telephony ports it equals. For example, if you have two 8-port PCI cards, then select the 16 Port PCI option.
• Now enter the serial number for each telephony card, whether it be PCI or USB. The order does not matter and you do not have to enter leading zeros.
• Click Configure Voice Boards and Install Service. Click Exit when finished.
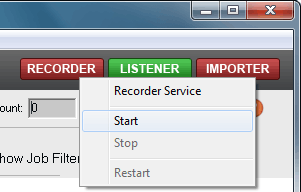
Step 9: To test your installation, open the Phoenix Navigator and start the Recorder service. Initially, the Recorder button should be red (at the top right of the Navigator screen). Right-click it and select Start. The button should turn green after a few seconds. This means the Recorder service is now running and you can now plug in any phone lines.
• Note that the first time the Recorder service is ran, Phoenix Server verifies that the telephony cards have valid DAC serial numbers. This requires that the server have an internet connection. Once verified and the service starts, the internet connection is no longer required.
The telephony card installation is now complete!
At this point, you can proceed to install some Additional Features or skip to the Windows Configuration to get your Phoenix Server live.
Skip down to:
Installing Additional Features
Configuring Windows
Product Activation
Installing Additional Features
This section will walk you through installing five optional features: SQLite Database Manager, Dss Service, Dragon Service, iNet 3, and Dss Extractor Pro.
Skip down to:
SQLite Manager
Dss Service
Dragon Service
iNet 3
Dss Extractor Pro
SQLite Database Manager
This application will allow you to edit the Phoenix databases. It is extremely rare that you would ever need to do so and it is recommended that only a DAC technician or authorized DAC dealer make such changes as database corruption could result from any mistakes. You can install the manager by:
• Running the installer from the Phoenix Server Install CD or
• Open the Phoenix System Finalizer. Under the Optional section, click the Install button for SQLite Database Manager.
Simply keep the defaults and the installation is complete.
Dss Service
The Dss Service and codec is necessary in order to import dss audio files into the Phoenix Server. If you will not be importing dss files then you do not need to install this feature.
Step 1: First, install the Dss Service. To do this, open the Phoenix System Finalizer. Under the Optional section, click the Install button for Dss Service (see image below).

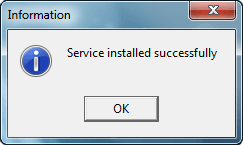
You will receive a popup stating the installation was successful. Click OK and you can quit the System Finalizer.
Step 2: Now you need to install the Dss codec. This is done by installing Dss Player Pro from the Olympus software install CD that is included.
Simply keep the defaults and the installation is complete!
Dragon Service
The Dragon Service is necessary in order to export audio files at a higher bitrate for Dragon NaturallySpeaking to convert them into text. If you will not be exporting to Dragon NaturallySpeaking then you do not need to install this feature.
Step 1: Install the Dragon Service. To do this, open the Phoenix System Finalizer. Under the Optional section, click the Install button for Dragon Service (see image below).

You will receive a popup stating the installation was successful. Click OK and you can quit the System Finalizer. Reboot for the change to take effect. The installation is complete!

iNet 3
iNet 3 is a transcription solution for Phoenix. In addition, it can be used to create detailed productivity reports from the server. If you do not need to create reports, or would like to run iNet 3 from a workstation instead, then you do not need to install this application.
Step 1: To install, simply run the installer from the Phoenix Server Install CD or from an iNet 3 Install CD.
Step 2: Keep all the defaults during the installation. By default iNet 3 will be looking for a server named dac7. You will need to change iNet 3's Server path to match the Phoenix server's IP address or name (see the iNet 3 User Guide for more).
Dss Extractor Pro
Dss Extractor Pro allows you to download a digital voice recorder to be imported into the Phoenix server. If do not need to download a digital voice recorder, or will do so from another computer, then you do not need to install this application.
Step 1: To install, simply run the installer from the Phoenix Server Install CD or from an iNet 3 Install CD.
Step 2: Keep all the defaults during the installation. Once installed, set the download path for each portable type to C:\VoiceSolutions\Import. If you installed the VoiceSolutions directory on a different drive letter, then enter that in place of C: (see the Dss Extractor Pro User Guide for more). Note that this download path will be changed to a network path when Dss Extractor Pro is installed on other workstations.
It's time to Configure Windows and do the Product Activation now!
Skip down to:
Configuring Windows
Product Activation
Configuring Windows
This section will walk you through sharing the VoiceSolutions directory, opening ports in your firewall, and making exceptions in your security software.
Skip down to:
Creating a Network Share
Firewall Configuration
Security Software Exceptions
Creating a Network Share
The VoiceSolutions root (by default: C:\VoiceSolutions) must be shared for these features to work:
• Phoenix Navigator to run on a remote workstation for administration
If you will not be using the above features, the VoiceSolutions root does not have to be shared, although it is recommended. Follow these guidelines when creating the share:
• Grant Full Control to the User or Group that will need to access the share
• If you want the share to be hidden, you can optionally add the dollar sign ($) after the share name when you create the network share (ex. voicesolutions$)
The Import folder (by default: C:\VoiceSolutions\Import) must be shared for these features to work:
• Dss Extractor Pro to upload audio files using the network path instead of the HTTP feature
• Importing audio files manually from a network connection
If you will not be using the above features, the Import folder does not have to be shared, although it is recommended. If the VoiceSolutions root is already shared, then the Import folder will also be accessible as it is located in the VoiceSolutions root. In this case, whether you decide to share the Import folder seperately or not is a matter of preference and security. Follow these guidelines when creating the share:
• Grant Full Control to the User or Group that will need to access the share
What we recommend: From a security standpoint, it is not wise to share the VoiceSolutions root unless it is a hidden share. This is because anyone browsing to the server could then easily access or delete audio or database files, causing not only a security breach but perhaps a Phoenix Server crash. Granted, a hidden share is still accessible but would require that the user enter the exact path, including $ sign, which is far less likely. Alternatively, if you will not be running Phoenix Navigator on a remote workstation, you could share the Import folder in place of the VoiceSolutions root. This is located at VoiceSolutions\Import. Sharing this folder will allow for remote audio files to be imported both manually and from Dss Extractor Pro when using a network path. Since there is not any content inside the Import folder (as files are imported instantly) then all security and stability issues are resolved regardless of who has access to this share.
Firewall Configuration
For iNet 3 to connect to the Phoenix Server and Dss Extractor Pro to use the HTTP upload feature, you will need to open their respective ports on the server and network firewalls. Since there are a variety of firewall software solutions out there please refer to that product's documentation for assistance. iNet 3 and Dss Extractor Pro are actually dependent on what the Apache Web Server service is configured to run on. So the port numbers are technically for Apache. Here are some tips:
• By default the Phoenix Server installer assigns port 3333 (HTTP) and 4444 (HTTPS) for iNet 3
• By default the Phoenix Server installers assigns port 5555 (HTTPS) for Dss Extractor Pro
• If you change the HTTP or HTTPS ports that Apahce Web Server is using, be sure to open those new port numbers in your firewall
Security Software Exceptions
There are a variety of anti-virus, anti-malware, and other security software products available. It is highly recommended that you make the VoiceSolutions root an exception in all such security applications. Some reasons are:
• Dictation files could be quarantined or purged, resulting in lost data
• Vital Phoenix application files could be quarantined or purged, resulting in complete system failure
Product Activation
Activating the Phoenix Server software allows the Importer service to run. Without the Importer service running, audio files cannot be imported. Activation is extremely simple.
Step 1: Open Phoenix Navigator from the server and from the main menu go to Help>System Information.
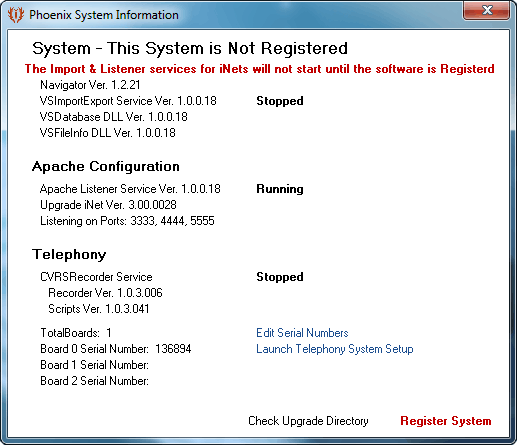
Step 2: The System Information screen will pop up. If the Phoenix Server is not activated, you will have Register System in bold red text at the bottom-right corner of the pop up. Click it to see more options.
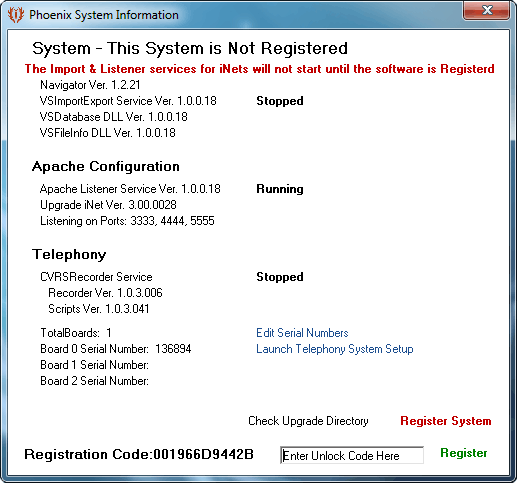
Step 3: You will need to provide us the Registration Code. You can do this by email or phone during regular business hours (see our website for the most current contact information). We will then provide you an Unlock Code. This will go in the box and then you need to click the bold, green Register text.
At this point, the Phoenix Server is activated and the Importer service can be started either from the Navigator or by a system reboot.
